![[PukiWiki] [PukiWiki]](image/pukiwiki.png)
![[PukiWiki] [PukiWiki]](image/pukiwiki.png)
https://grafana.com/docs/grafana/latest/installation/docker/
influxdbと連携させたいので、influxdb も一緒にインストール。
docker-compose.yml
version: "3"
services:
  influxdb:
    image: influxdb:latest
    container_name: local-influxdb    # grafanaからの接続用にコンテナ名を明示しておく
    hostname: local-influxdb
    ports:
      - "8086:8086"
    volumes:
      - ./influxdb/data:/var/lib/influxdb
  grafana:
    image: grafana/grafana:latest
    ports:
      - "3000:3000"
    volumes:
      - ./grafana/dashboards:/etc/grafana/provisioning/dashboards
      - ./grafana/datasources:/etc/grafana/provisioning/datasources
    depends_on:
      - influxdb
    environment:
      - GF_SERVER_ROOT_URL=http://localhost:3000
      - GF_SECURITY_ADMIN_PASSWORD=admin
起動
docker-compose up -d
Starting influxdb_grafana_influxdb_1 ... done
Recreating influxdb_grafana_grafana_1 ... done
influxdbのコンテナに入ってDBを作成しておく
docker exec -it `docker ps | awk '/8086/ {print $1}'` /bin/bash
# influx -execute "create database mydb1"
# exit
python 仮想環境の作成とinfluxdb用のクライアントライブラリのインストール
※ https://github.com/influxdata/influxdb-python
python3 -m venv venv
source venv/bin/activate
pip install influxdb
サンプルデータは以下の通り作成した。
create_sample_data.py
import random
from datetime import datetime
from datetime import timedelta
from influxdb import InfluxDBClient

if __name__ == '__main__':

    # 1分間隔でデータ作成
    interval_sec = 1

    # 最初と最後のデータの日時 ( 現在日時の24時間前〜2時間後まで )
    first_datetime = datetime.now() - timedelta(hours=int(24))
    last_datetime = datetime.now() + timedelta(hours=int(2))

    # 一度に書き込むサイズ
    batch_size = 100

    records = []
    client = InfluxDBClient('localhost', 8086, 'admin', 'admin', 'mydb1')

    for server in ["server01", "server02"]:
        ts = first_datetime
        while True:
            date_text = ts.strftime("%Y-%m-%dT%H:%M:%SZ")
            records.append({
                "measurement": "cpu_load_sample",
                "tags": {
                    "host": server,
                },
                "time": date_text,
                "fields": {
                    "value": round(random.random(),2)
                }
            })

            if len(records) >= batch_size:
                client.write_points(records)
                print("writed ... server: {}, time: {} 〜 {}".format(server, records[0]["time"], records[-1]["time"]))
                records = []

            if ts.timestamp() >= last_datetime.timestamp():
                break

            next_ts = ts.timestamp() + interval_sec
            ts = datetime.fromtimestamp(next_ts)

    if len(records) > 0:
        client.write_points(records)

    result = client.query('select first(value) from cpu_load_sample;')
    print("First: {}".format(result))
    result = client.query('select last(value) from cpu_load_sample;')
    print("Last : {}".format(result))
データ作成の実行
python3 create_sample_data.py
http://localhost:3000 にアクセスして設定を行っていく。
Configuration から [Add data source] で InfluxDB を選択後、以下の通り作成する。
| 設問/設定 | 設定/選択値 | 補足 | |
| HTTP | Name | InfluxDB_mydb1 | |
| URL | http://local-influxdb:8086 | docker-compose.yml で指定したコンテナ名 | |
| InfluxDB Details | Database | mydb1 | |
| User | admin | 初期パスワードから変更していない場合 | |
| Password | admin | 〃 |
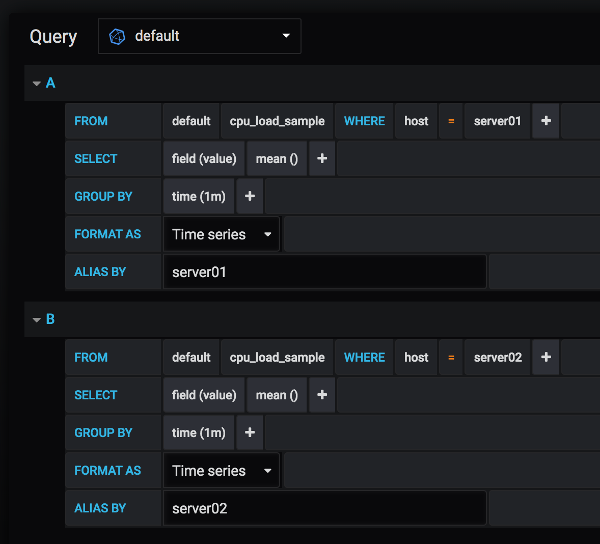
[New dashboard] → [Add Query] から以下の通り作成。

最後に右上の [Save dashboard] で保存
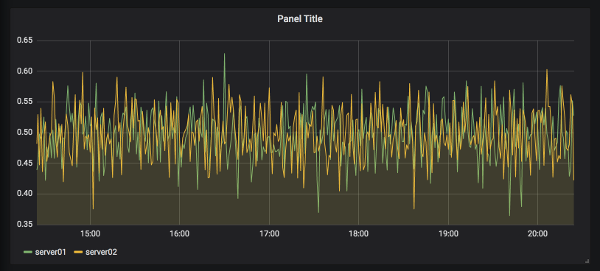
作成されたダッシュボードのイメージ

タイムゾーンの設定は [Configuration] → [Preferences] から行う事が可能。